Help:Editing:Intermediate
Contents
- 1 Indenting
- 2 Lists
- 3 Getting Started
- 4 Uploading
- 5 Using Images
- 6 See also
- 7 Basic usage
- 8 Basic Table templates
- 9 Advanced Table templates
- 10 List of Table Templates in EcoliWiki
- 11 About
- 12 Creating a template
- 13 Using a template
- 14 Control template inclusion
- 15 Transcluding a page that isn't a template
- 16 List of Table Templates in EcoliWiki
- 17 Templates
- 18 Including content from one page into another.
- 19 More Info
Indenting
To indent a block of text, use a colon (:) like this:
:Level 1
::Level 2
:::Level 3
Gives:
- Level 1
- Level 2
- Level 3
- Level 2
This is especially useful on discussion pages, where indentation can indicate replies to a particular comment.
Lists
More on help with lists at Meta-Wiki.
There are different kinds of lists.
BulletedUse * to start each line. Different numbers of *s give different levels of nesting. | |
| Markup | Gives on the page: |
|---|---|
*item *item **item **item *item **item ***item *item |
|
Numbered
Use # to start each line. Different numbers of #s give different levels of nesting. Note that this does not give outline numbering, as in the table of contents boxes.
| Markup | Gives on the page: |
|---|---|
#item #item ##item ##item #item ##item ###item #item |
|
More list examples | |
| Markup | Gives on the page: |
Indent the whole list
:*Item 1 :*Item 2 :**Item 2.1 :*Item 3 |
|
Mix types w/continuation
#Item 1 has an embedded numbered list ##Item 1.1 ##Item 1.2 #:and then item 1 continues #Item 2 ##Item 2.1 has an embedded bulleted list ##*2.1.1 ##*2.1.2 ##:before it continues ##Item 2.2 |
|
Some of the more complex list types don't render particularly well, and should probably be avoided.
Getting Started
Images in EcoliWiki are particularly useful for showing gene constructs, structures of gene products, plasmid maps, etc. Uploading images is simple enough. First, you must be logged into EcoliWiki. If you don't have an account, request one by emailing EcoliWiki at ecoliwiki@gmail.com. Embedded images on EcoliWiki must be uploaded, and then linked to a page. Information on how to uploaded images is provided in the next section. The most recently uploaded images and files are listed in Special:Newimages.
Uploading
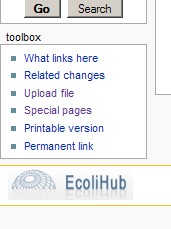
Once you're logged in, there will be a toolbox on the left-hand side of the page. In it will be an Upload file link.
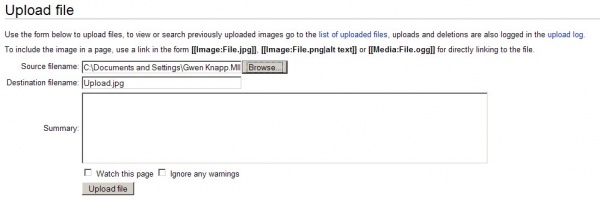
Once you have clicked Upload file, you'll be taken to a page similar to this:
To upload an image on your computer, click Browse and locate the file of interest. If you want, write a brief summary about the image. Once you've located the file, click the Upload File button.
If all goes well, you'll be taken to a page that shows the image. One error you might get is that a file is larger then the recommended file size. You can try and resize your image on the computer, then re-upload the file.
Using Images
Using images in EcoliWiki is done by doing the following: Let's say you want to link to an image called Fun.JPG. To do this, simply type [[Image:Fun.JPG]] and the image will appear.
Clicking on the image will take you to the image page in EcoliWiki.
Let's say though, that you wanted to make the picture smaller and move it to the right of the page. You can do this by adding some wiki code after the file name. For example, | thumb| will make the image a thumbnail. Writing [[Image:Fun.JPG|thumb|right]] will make the picture go to the right of the page, like in the example below:
Now our image is on the right and we can write on the left.
Image inclusion syntax
To generalize the above: there is a syntax for adding images in Mediawiki wikis. To add an image, use:
- [[Image:ImageFileName|{type}|{location}|{size}|{caption}]]
{type}, {location}, {size}, and {caption} are all optional. Anything that is not recognizable as {type} {location} or {size} is treated as a caption.
- type: allowed values are 'thumb', 'thumbnail' or 'frame'. If this is left blank, there is no box around the image, and it doesn't display a caption
- location: allowed values are 'right', 'left', 'center' or 'none'. Text will wrap around 'left' or 'right' but not around 'center'. Use {{Clr}} to prevent text below from wrapping.
- size:{width}px width in pixels. Ignored if type is 'frame'.
Examples
In the examples below, the image is placed at the beginning of a block of nonsense text, so you can see how wrapping around the image works.
Simple Image
[[Image:Fun.JPG ]]

Simple Image Resized
[[Image:Fun.JPG |50px]]
Lorem ipsum dolor sit amet, consectetur adipisicing elit, sed do eiusmod tempor incididunt ut labore et dolore magna aliqua. Ut enim ad minim veniam, quis nostrud exercitation ullamco laboris nisi ut aliquip ex ea commodo consequat. Duis aute irure dolor in reprehenderit in voluptate velit esse cillum dolore eu fugiat nulla pariatur. Excepteur sint occaecat cupidatat non proident, sunt in culpa qui officia deserunt mollit anim id est laborum
Framed Images with caption
Default alignment: [[Image:Fun.JPG |frame| Sample image figure legend]]
Lorem ipsum dolor sit amet, consectetur adipisicing elit, sed do eiusmod tempor incididunt ut labore et dolore magna aliqua. Ut enim ad minim veniam, quis nostrud exercitation ullamco laboris nisi ut aliquip ex ea commodo consequat. Duis aute irure dolor in reprehenderit in voluptate velit esse cillum dolore eu fugiat nulla pariatur. Excepteur sint occaecat cupidatat non proident, sunt in culpa qui officia deserunt mollit anim id est laborum
Centered: [[Image:Fun.JPG|frame|50px|center| Sample image figure legend]]
Note that size is ignored when frame is set. Lorem ipsum dolor sit amet, consectetur adipisicing elit, sed do eiusmod tempor incididunt ut labore et dolore magna aliqua. Ut enim ad minim veniam, quis nostrud exercitation ullamco laboris nisi ut aliquip ex ea commodo consequat. Duis aute irure dolor in reprehenderit in voluptate velit esse cillum dolore eu fugiat nulla pariatur. Excepteur sint occaecat cupidatat non proident, sunt in culpa qui officia deserunt mollit anim id est laborum
Thumbnails
[[Image:Fun.JPG|thumb|50px|left|Sample image figure legend]]
Lorem ipsum dolor sit amet, consectetur adipisicing elit, sed do eiusmod tempor incididunt ut labore et dolore magna aliqua. Ut enim ad minim veniam, quis nostrud exercitation ullamco laboris nisi ut aliquip ex ea commodo consequat. Duis aute irure dolor in reprehenderit in voluptate velit esse cillum dolore eu fugiat nulla pariatur. Excepteur sint occaecat cupidatat non proident, sunt in culpa qui officia deserunt mollit anim id est laborum
See also
Exended_image_syntax at Wikipedia
Help:Images_and_other_uploaded_files at metawiki
Basic usage
TableEdit provides a more user-friendly way to create and edit tables in MediaWiki than using the standard wiki mark-up. TableEdit tables show up in a page with their own Edit link. Registered users can then add rows and columns, add information, and/or edit information already in the table.
Create a new table
Step 1: Add a newTableEdit tag where you want the table to appear.
To add a new table that can be edited by TableEdit, there are two options:
- Add an empty table by putting <newTableEdit/> in the text where you want the table to appear.
- Add a table with defined headings by entering the following:
- <newTableEdit>
- Heading 1
- Heading 2
- Heading 3
- etc...
- </newTableEdit>
- You can edit the columns later if needed.
Step 2: Save the page.
If you used option 2, an empty table with your headings appears when you save the page. Note that the default table has the column headings arrayed horizontally from left to right. You can change the orientation when you edit the table.
If you used option 1, there will a Create table here link. You can create the headings when you edit the table.
Step 3: Edit the table Click on the link and use the table editor to add information.
Example
Creating a New Table
- 1. Click on the "create table" quick button. This will insert the tags <newTableEdit> and </newTableEdit> automatically.
- 2. Create the table headings by typing inside the <newTableEdit> tags.
- <newTableEdit>
- US State
- Capitol
- Governor
- </newTableEdit>
- 3. Type a short summary of your edit and click save
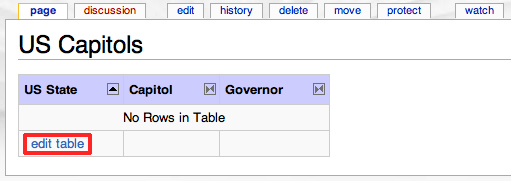
- 4. Click on the edit table link to go to the Table Editor.
- 5. Add a row.
- 6. Add any information you know and click save.
- Lets say I don't know the governor, so I'll leave it for someone else to add.
Editing the Headings
- 7. Let's add a column called "State Bird". First click Edit Headings
- 8. Then click Add headings. You can now name your head in the box provided. Now click save..
- 9. Save the table back to the wiki page.
- 10. Your table will look like this now:
Basic Table templates
For table formats that you plan to use on more than one page, you can define a template. The template should be a Template page in the wiki that has a list of the table headings. When a table is made using a template, the headings can only be edited on the template page. Changing the template page will change the headings on all tables that use that template. Note that the changes won't be apparent until someone tries to edit the table and save it back to the page.
To add a table based on a template to a wiki page, put: <newTableEdit>Template:TemplateName</newTableEdit>.
To Find your specific TemplateName please see Table Templates.
Advanced Table templates
Using tags to specify more table properties
Attributes for the table can be wrapped in XML-like tags.
- Use <type>1</type> to create a vertical table, i.e. the headings are arrayed from top to bottom in the first column. The default is a horizontal orientation where the headings are arrayed from left to right in the first row.
- Use <headings></headings> for headings. Headings can have additional attributes, which can be used to customize the user interface and link content of rows to external sources (see below).
- Use <heading_style></heading_style> for heading style
- Use <table_style></table_style> for table style
Programming the TableEdit interface
Heading lists can have additional markup to modify the behavior of the Table Editor. Anything after a || in the headings list is considered part of a list of additional parameters for that heading. Individual parameters are delimited by single |s. The first parameter after the heading text is a unique column_name for the heading (this allows you to use non-unique names for the actual display). If this is not present, the heading name is assumed to be usable as the column_name. These are used for lookup and calculation fields as described below
List of Table Templates in EcoliWiki
About
We use templates to control the layout of our pages.
Creating a template
Template names are prefixed with Template:, you create them like any other wiki page.
Using a template
Templates are wiki pages which can be used in other pages in three ways:
{{Name}}includes the content of the template at the moment the page containing it is fetched "[[Template:Name]]".{{subst:Name}}inserts the content of the template into the code of the page in a form that is editable normally "[[Template:Name]]" after you have saved your text.{{msgnw:Name}}when the page containing it is fetched, includes the template in a form that displays it as raw wiki syntax, like<nowiki>does
Control template inclusion
You can control template inclusion by the use of <noinclude> and
<includeonly> tags.
Anything between <noinclude> and </noinclude> will be processed and
displayed only when the page is being viewed directly, not included.
Possible applications are:
- Categorising templates
- Interlanguage links to similar templates in other languages
- Explanatory text about how to use the template
The converse is <includeonly>. Text between <includeonly> and
</includeonly> will be processed and displayed only when the page is
being included. The obvious application is to add all pages containing a given template to a category.
Note that the usual update problems apply -- if you change the categories inside a template, the categories of the referring pages won't be updated until those pages are edited.
Transcluding a page that isn't a template
You can also transclude a non-template page by putting using {{Namespace:Page title}}. The main namespace is the default, so using :Page title will include a regular article. This kind of transclusion is used to make the "On one page" tabs on our gene pages.
List of Table Templates in EcoliWiki
Templates
Including content from one page into another.
More Info
- Basic Editing tutorial - Just enough to get started: Entering Edit mode for existing pages, creating new pages, adding Links, basic formatting (italic,bold,bold-italic), Subheadings, Categories
- Intermediate Editing tutorial (all on one page) - For users who want more control over appearance: Indenting, Lists, Image and table basics. Basic templates, Including content from one page into another. Individual tutorials:
- Lists
- Images
- Tables
- References
- Templates - includes how to include content from another file, as either an editable or noneditable copy
- Advanced Editing tutorial - Advanced topics: for those who will be building templates, and those who just want to know what else can be done
- Editing outside the wiki - using MS Word or other converters.


